Contents

Docker containers using Ansible on AWS

In the article we will see how to run docker container on target machine using ansible playbook on AWS instance.


Ansible is an open-source configuration management and deployment tool.

Below are the steps to run docker container on AWS EC2 instances using Ansible playbook.


  • Create AWS EC2 instances (master and slave)
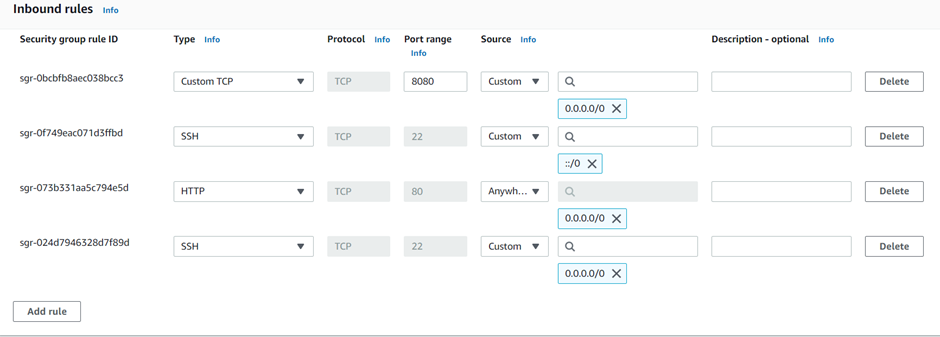
  • Update the security group of slave exposing port 8080
  • Install Ansible on master
  • Install python on slave
  • Update /etc/ansible/hosts on master with the slave IP
  • Create a dockerfile which will be used to create customized image
  • Create an ansible playbook with detailed tasks
  • Execute the ansible playbook
  • Check if the docker container is running successfully on the slave machine

Install Ansible on master machine:

Execute the below commands to install Ansible on the master machine:

1
2
3
4
sudo apt-get update
sudo apt install software-properties-common
sudo apt-add-repository ppa:ansible/ansible
sudo apt-get install ansible

Install Python on slave machine:

Use the below commands to install python on the slave machine:

1
2
sudo apt-get update
sudo apt-get install python

On the master machine perform the below steps to create ssh-keygen:

1
2
cd /home/ubuntu/.ssh
ssh-keygen

File names id_rsa.pub will be generated after executing ssh-keygen on master machine.

/images/docker_vh/1_on_master_machine.png
on master machine


Copy the contents of the id_rsa.pub file and paste it on slave machine inside the authorized_keys file located at /home/ubuntu/.ssh

/images/docker_vh/2_on_slave_machine.png
on slave machine


Update the hosts file on master:

To establish ssh connection with the slave machine, add the IP of the slave machine on master’s hosts file.

To edit the hosts file use the below command:

sudo nano /etc/ansible/hosts


Paste the below content at the end of the file:

1
2
[production]
slave ansible_ssh_host=<slave-IP>

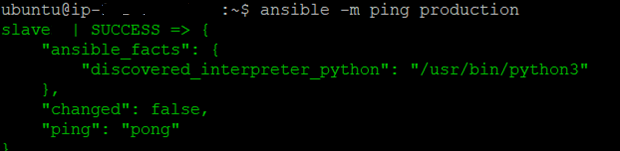
To verify the ssh connection between the master and slave, execute the below command:

/images/docker_vh/3_output_ping_master.png
output of the ping command on master machine


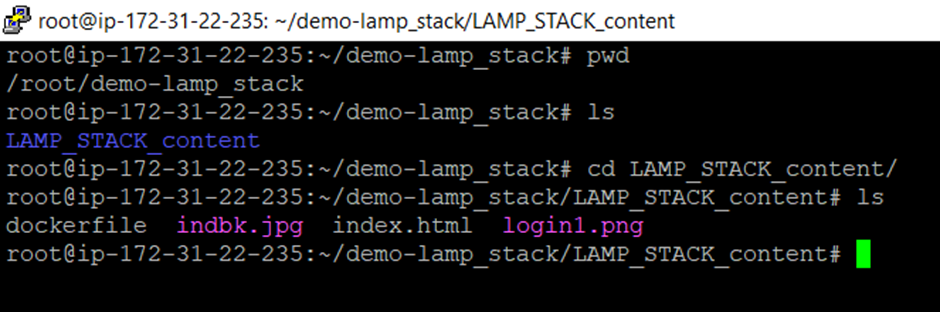
Creating the code directory on master machine:

Create a directory named LAMP_STACK_content at /home/ubuntu/ location on the master machine. Create a dockerfile at this location.


Create a dockerfile:

In order to create a customized image we will create a dockerfile with the following contents:

 1
 2
 3
 4
 5
 6
 7
 8
 9
10
11
12
13
14
15
16
17
18
19
20
21
22
23
24
25
26
27
28
29
30
31
32
33
34
35
36
37
38
39
40
41
42
43
44
45
46
47
48
49
50
51
52
53
54
55
56
# Dockerfile for LAMP Stack installation
# Ubuntu 18.04 image
FROM ubuntu:18.04

ENV DEBIAN_FRONTEND=noninteractive
RUN apt-get update -y
RUN apt-get upgrade -y

# Install apache
RUN apt-get install -y apache2 

# Prerequisites for installing php7.3
RUN apt-get install -y software-properties-common

RUN add-apt-repository ppa:ondrej/php

RUN apt install -y php7.3-fpm

# Install php7.3 for this set up
RUN apt install -y php7.3

# Extensions of php
RUN apt install php7.3-common php7.3-mysql php7.3-xml php7.3-xmlrpc php7.3-curl php7.3-gd php7.3-imagick php7.3-cli php7.3-dev php7.3-imap php7.3-mbstring php7.3-opcache php7.3-soap php7.3-zip php7.3-intl -y

# Removing the default index.html page and copying the project code
RUN rm -f /var/www/html/index.html

COPY . /var/www/html/   

# Install ufw
RUN apt install ufw -y
RUN ufw app list

# install library
RUN apt-get install libapache2-mod-php7.3


# install additional packages
RUN a2dismod mpm_event &&  a2enmod mpm_prefork &&  a2enmod php7.3

# Restart apache
RUN service apache2 restart

# Provide executable permissions to the code
RUN chmod -R 0777 /var/www/html/*
RUN chmod -R 0777 /var/*

# Change WORKDIR
WORKDIR /var/www/html

CMD ["apachectl","-D","FOREGROUND"]

RUN a2enmod rewrite

EXPOSE 80
EXPOSE 443

Create ansible playbook:

Create an ansible-playbook-lamp-stack-new.yaml file on master with the below content.

 1
 2
 3
 4
 5
 6
 7
 8
 9
10
11
12
13
14
15
16
17
18
19
20
21
22
23
24
25
26
27
28
29
30
31
32
33
34
35
36
37
38
39
---
- hosts: slave
  become: yes
  gather_facts: no
  tasks:
    - name: create build directory
      file:
        path: /root/demo-lamp_stack
        state: directory
        owner: root
        group: root
        mode: '0755'
    - name: copy Dockerfile
      copy:
        src: /home/ubuntu/LAMP_STACK_content
        dest: /root/demo-lamp_stack/
        owner: root
        group: root
        mode: '0644'
    - name: build and push container image
      community.docker.docker_image:
        build:
          path: /root/demo-lamp_stack/LAMP_STACK_content/
        name: dock1998/lamp_stack_new:v1
        source: build
        state: present
    - name: Running the container
      community.docker.docker_container:
        image: dock1998/lamp_stack_new:v1
        name: lamp_stack_new_cont
        state: started
        ports: "8080:80"
    - name: Tag and push to docker hub
      community.docker.docker_image:
        name: dock1998/lamp_stack_new:v1
        repository: dock1998/lamp_stack_new:v2
        push: yes
        source: local
        state: present

Execute the ansible playbook:

Note: Before proceeding ahead with the next steps, you will need to perform docker login using the dockerhub account on the slave machine from where the image will be pushed and pulled.


To execute the playbook use the below command:

ansible-playbook ansible-playbook-lmap-stack-new.yaml

/images/docker_vh/4_output_on_master.png
output of the above command on master machine


To verify the execution of playbook:

Check if the code directory is copied on the slave machine.

/images/docker_vh/5_output_on_slave.png
output on slave


Check if the docker container is running on the slave machine:

docker ps

/images/docker_vh/6_output_dockerps_slave.png
output of docker ps on the slave machine


Note: If you get permission denied error after executing docker ps command then you need to give permissions to the docker.sock file by executing the below command:

chmod -R 0777 /var/run/docker.sock


On the slave machine add the in-bound rules to direct traffic to the port 8080 by updating the security groups on the AWS console as shown below.

/images/docker_vh/7_awsconsole_onslave.png
AWS console for slave machine


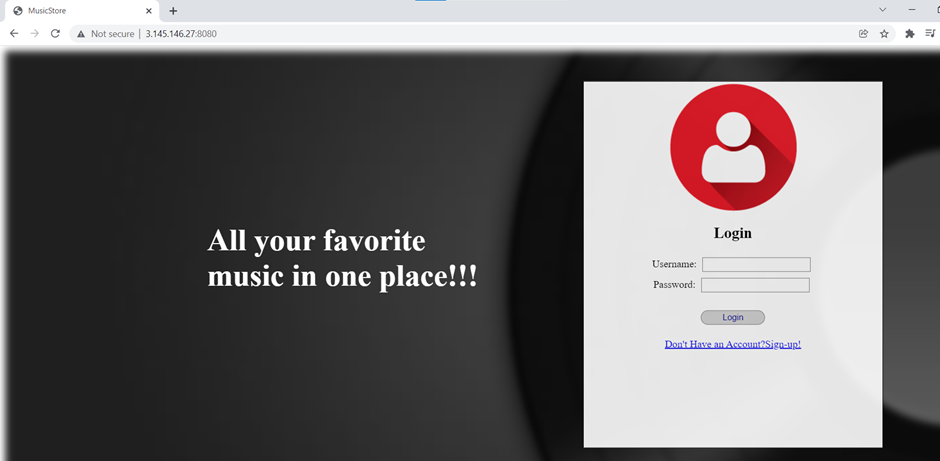
Access the slave IP with the exposed port 8080 on the browser and the application should be up.

/images/docker_vh/8_app_8080.png
Application running on port 8080


Hope the article was useful, thanks for reading! Happy learning. 👍


Vrinda Hegde is a DevOps Engineer, who likes to explore orchestration tools and automate the process of deploying containerized applications. She likes to share her findings by writing articles on medium.com. She can be reached out on LinkedIn or via email


Siya Amonkar is a DevOps Engineer who likes to explore new tools and technologies. She can be reached out on LinkedIn or via email